How to create a database using XAMPP and PhpMyAdmin
How to create a database using XAMPP and PhpMyAdmin
When you work on a website that is either hosted or local on your computer, you sometimes need a
database for it. Back in the day you would need to know SQL and how to run these commands at
some kind of prompt. Nowadays we have phpMyAdmin, a graphical user interface for SQL.
database for it. Back in the day you would need to know SQL and how to run these commands at
some kind of prompt. Nowadays we have phpMyAdmin, a graphical user interface for SQL.
You can click, enter text boxes, and after a while you will create a database with tables, columns,
user rights etc.
user rights etc.
To use phpMyAdmin, you must either install host software on your computer, such as XAMPP, MAMP,
LAMP or WAMP. Or you can get a web host that already has it installed on it. In these software
packages "AMP" stands for MySQL (Database), Apache (Web Server), and PHP. M is for Mac, L is for
Linux and W is for Windows. XAMPP makes them all so that's the one I'd recommend starting out with.
LAMP or WAMP. Or you can get a web host that already has it installed on it. In these software
packages "AMP" stands for MySQL (Database), Apache (Web Server), and PHP. M is for Mac, L is for
Linux and W is for Windows. XAMPP makes them all so that's the one I'd recommend starting out with.
As far as web hosting is concerned, the one I use and highly recommend interserver.net. They are
cheap, reliable, charge you every month and do not raise their prices as most other web hosting companies do.
cheap, reliable, charge you every month and do not raise their prices as most other web hosting companies do.
In this blog post, I will only show how to create a database with a table and some columns. It is
possible to download / install XAMPP, access phpMyAdmin, create a database and use PDO
(PHP Data Objects) to connect to it. Now I will show you how to use phpMyAdmin!
possible to download / install XAMPP, access phpMyAdmin, create a database and use PDO
(PHP Data Objects) to connect to it. Now I will show you how to use phpMyAdmin!
To access phpMyAdmin from XAMPP, make sure Apache and MySQL are running in the XAMPP control
panel by clicking the start buttons below the Actions column.
panel by clicking the start buttons below the Actions column.

If Apache and MySQL are green, everything is fine. Then you can click on the "Admin" button in the MySQL row
and it will start phpMyAdmin:
and it will start phpMyAdmin:

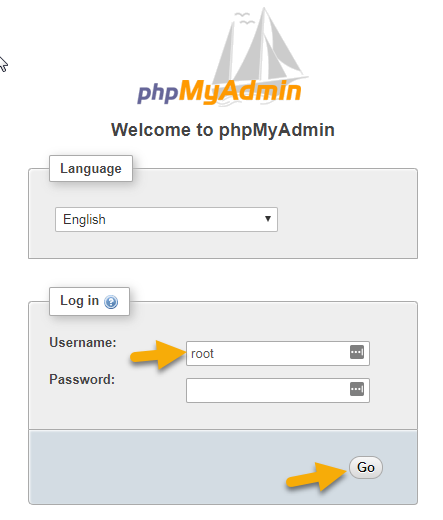
You can also access phpMyAdmin by typing in http: // localhost / phpmyadmin / in your browser. The first time
you open it, you have to log in with "root" as the username and there is no password. Once you have entered it,
click "Go":
you open it, you have to log in with "root" as the username and there is no password. Once you have entered it,
click "Go":
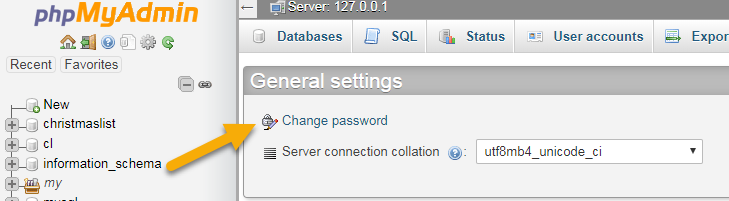
When you are logged in, I recommend that you change your password to secure your databases and their settings:
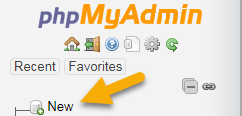
Once you have done that. You want to create a new database by clicking here:
You are then prompted to name the database, do so, and then click "Create":

Then you will be asked to create a table with how many columns you want. Once you have decided,
click "Go" again:
click "Go" again:

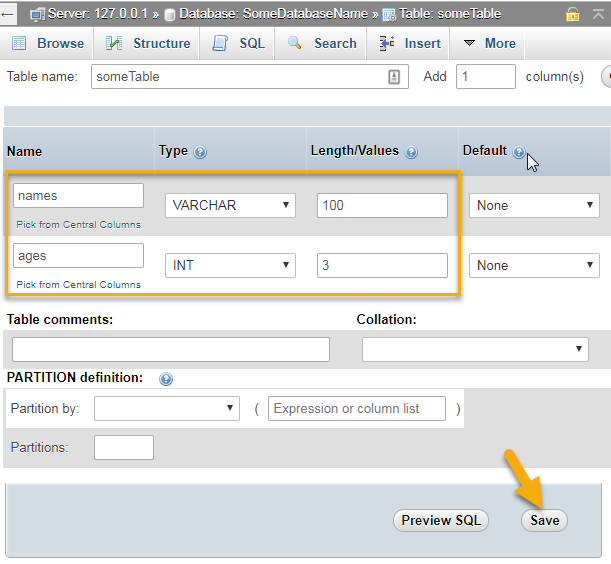
This will require you to plan your database a bit. You need to know exactly what you store in it.
In this example, we store the user's name and age. So on the next screen we will add a column
with names and ages. We also have to give them a type, the age will be INT (integers / numbers)
and the names will be VARCHAR (characters / letters). Finally, we must say how many characters
can be in each column. The age will be 3 because I don't think anyone would live to be older than
999 (and we'll give 100 characters for their names which should be enough. When we filled in those
fields, we would click "Save":
And there you have it! A new database with a table with two columns in it ready to be filled. Make sure
to watch the video at the top of this post to see how to connect to the PHP Data Objects (PDO) database.
Also, check out our PHP training in Chandigarh course to learn more about PHP, databases, and
how to use them together. Have a great day
to watch the video at the top of this post to see how to connect to the PHP Data Objects (PDO) database.
Also, check out our PHP training in Chandigarh course to learn more about PHP, databases, and
how to use them together. Have a great day

Comments
Post a Comment